Showing posts with label frugal living info. Show all posts

Tuesday, July 22, 2014

Trying to be healthier... Cornbread Makeover!


So, we've been trying to "step-up" 
being healthy even more than ever!

We've been trying to eat more beans, legumes, veggies and healthy fats and have tried to keep our "glycemic" index down as much as possible Monday-Fridays! 
On the weekends we do a little more splurging.
To keep our glycemic index down, 
I've been trying to limit using "unbleached white flour" in my recipes to only cookies and desserts, which means it has been a fun journey for me to tweak my bread recipes to use more whole wheat flour and I've also been venturing out and try using oat flour as well.
Since we purchase steel cut oats in 25 pound bags, I have an abundance of them and so I've been grinding my steel cut oats into flour and incorporating it into my baking.
Well, it turns out, you can't completely 
use oat flour in a recipe if you want it to turn out,
because oats don't contain gluten and so it behaves differently than wheat flours.  
However, after experimenting, I have been able to successfully replace oat flour for up to 1/2 of the whole wheat flour.

When I made up a batch of Bean Chowder for my family, it was just automatic that we would have a delicious pan of Corn Bread to go along with it.  
Cooked bean dishes at our house mean "Corn Bread"! 
So, I tweaked my Corn Bread recipe to use not only less sugar, 
but, less refined sugar. 
(took it from 1/2 cup white flour to 1/3 cup raw cane sugar)
(I buy these bags of Raw Cane Sugar at any of our local grocery stores in the Mexican Food Section.)

I also used one cup whole wheat flour and 3/4 cup oat flour 
and it turned out to be an absolute success!
It was very hearty tasting, VERY moist and delicious and it had my family begging me to make more!

I'll never 
make Corn Bread from unbleached flour again. 
Raw Cane Sugar, Whole Wheat and Oat Flour is how it will be made at our house from here on out.

Delicious Corn Bread 
1/2 cup butter
1/3 cup raw cane sugar
2 eggs
3/4 cup cornmeal
2 tsp baking powder 
1/2 tsp. salt
1 cup whole wheat flour
3/4 cup freshly ground oat flour
1-½ cups milk

Cream butter and sugar. 
Add eggs and stir.
Add in cornmeal, baking powder and salt and stir until just combined
Add flours alternatively with milk. 
Put in greased 9x9 pan.
Bake 350 degrees for 30-45 minutes until lightly browned and toothpick inserted in comes out clean. 
(oven temps vary...check after 30 minutes). 
Absolutely delicious! 
ENJOY... 
being a little more healthy in your day to day life... 
one recipe at a time! 

(PS...I really enjoyed this site here for information about Oats) 

Sunday, January 12, 2014

Potato and Ham Casserole

We have a new favorite recipe at our house...

When I had surgery,
one of our sweet neighbors brought in the most delicious meal that my men just LOVED! 
Who would have known that Potato Casserole 
with a little bit of ham mixed in it, 
makes such a delicious dinner!

Serve this with a LARGE serving of steamed vegges, OR, large salad and you have a great, filling, frugal meal.

I usually make my Potato Casserole 
and serve it with ham, or, roast, on the side, 
however, this way is much better, 
because you don't over indulge with eating too much meat.

It's "Lagom"...
There's just the right amount of meat to give it some flavor and to make you feel satisfied!
SO, if you have some leftover Christmas or Easter ham in your freezer, this is the perfect recipe to use you ham in.

AND, the leftover Potato Casserole is awesome to brown up and scramble in some eggs and serve for breakfast!
As usual, I have made my own cream soup replacement for this, but, if you don't want to make your own, just dump in a can of Cream of Chicken/Mushroom soup and 1-2 cups sour cream and it tastes great too!
(that's what my neighbor did and my men thought it was delicious and begged me to get the recipe)

(original Potato Casserole Recipe here)


Potato and Ham Casserole 

Boil 8 large potatoes until tender and then run under cold water and then peel and dice them into chunks

2 Tbsp. Melted butter
1 onion finely chopped
1-2 cups chopped ham
(one recipe of sauce below) (or, just add in a Can Cream of Chicken Soup and 1-2 cups sour cream)
2 cups grated cheese of your choice (I use SHARP cheese)
salt and pepper to taste

(sauce)
3 Tbsp. butter
1/3 cup flour
2 cups chicken broth
1 cup sour cream 
Melt butter and then add in flour and whisk until well combined
Add in chicken broth and whisk together and boil until thickened (about 5 minutes)
Add in sour cream and stir until smooth.

Mix together diced potatoes, chopped ham, melted butter and onions.
Then add in white sauce/sour cream mixture and cheese.
Stir until well mixed.
Put in 9x13 pan... 
Bake covered at 350 degrees for 60-75 minutes—
uncover last 10 minutes  Enjoy!

AND remember if you have any leftover casserole you can turn it into a great breakfast, by browning up the casserole in a little bit of butter and then scrambling in some eggs!  
Kids and hubby LOVE this for breakfast!


PS...
(I apologize for photos that are not the best coloring/quality. I forget that in the WINTER months if I want to blog about a recipe and take photo, I need to make sure I make it early enough in the day where there is still some day light to capture some great photos. I didn't quite bake this in time to get that...you live and learn!).

Thursday, August 15, 2013

Delicious Fresh Peach Pie

Tis the season for ripe juicy peaches!

We've been enjoying peaches for
 breakfast, lunch and dinner at our house.

Sometimes we wash and eat peaches by themselves...

Sometimes, we slice them and and enjoy them 
with Greek Yogurt, 
or, put them in a bowl and pour milk on them.
We've even been enjoying them 
on top of  our Buttermilk Pancakes!  

Another favorite, is that of FRESH Peach Pie!  

I had my first taste of FRESH peach pie,
while visiting my Aunt Eloise in California when I was just a young girl.
It was so delicious and I couldn't get enough of it! 

 I have made this pie for my own family at least once or twice a year during our entire marriage and it really is something that we all look forward to.  

However, the recipe, called for a package of Peach Jello (here)
and since my passion is making everything from scratch and trying not to use "Mixes" of any kind,
I decided to venture out and follow the recipe for my Fresh Strawberry Pie, which involved water, cornstarch, salt, sugar, butter, pureed peaches and vanilla. . It worked SO well and tasted just as delicious (if not BETTER), than my recipe that used peach Jello!

It's another WINNER for sure!
I LOVE that I can take basic staple ingredients that I always have on hand and turn them into something fabulous and delicious!

Fresh Peach Pie  

7-9 large peaches peeled and thinly sliced (depending how large your pie pan is)

(in a heavy sauce pan mix the following)
1 cup water
2/3 cup OR 3/4 cup sugar (depending how sweet your peaches are)
1/4 cup Corn Starch
1/4 tsp salt 
(whisk together to make sure there are no lumps)

Bring above ingredients to boil and then add in:
2 peaches that have been pureed
2 Tbsp butter

Continue cooking until heated through...
Remove from heat and add in:
2 tsp. vanilla
Let cool slightly 

Prepare pie crust (make and bake it) (here for my favorite pie crust recipe)
Cover the bottom of cooked crust with a little bit of glaze.
Fill baked pie crust with fresh sliced peaches
Pour glaze over the top of peaches 
and chill 2-3 hours.
Serve with whipped cream
Enjoy a taste of heavenly yummyness today!

Saturday, August 3, 2013

Chocolate Chip Banana Bread...

Who ever came up with the saying that 
"Chocolate Makes Anything Better"
 was totally on to something. 

My sweet friend Katie dropped me off a loaf of  Chocolate Chip Banana Bread a few weeks ago. (here)

My boys just loved it
and I even had someone comment that they wanted the recipe for it, on the post that I did.
 So, I decided to take my Banana Bread recipe and just sprinkle on some Dark Chocolate Chips on top of the batter before I put it into the oven.
It turned out perfect and delicious 
and left my boys wanting for more!

I'm thinking that the addition of chocolate chips
to our Banana Bread is going to be something we'll be doing from now on!

Of course, I always use this helpful tip when any recipe that I make calls for one cup of oil. 

Banana Bread
3 eggs
¾ cup sugar
½ cup oil
½ cup applesauce
2 tsp. Vanilla
3 cups mashed banana (or however much banana you have)
Mix together the above 6 ingredients 

Then add in:
1 tsp. salt
1 tsp. baking soda
1/4 tsp baking powder

After you have mixed this well add in: 
3 cups unbleached flour

Grease two loaf tins.
Pour mix into tins.

SPRINKLE batter with Dark Chocolate Chips (about 1/3 cup per loaf pan)
Bake at 375 degrees for 40-45 minutes. (or until toothpick inserted in comes out clean)
After you have pulled it out of the oven, 
remove from loaf pans  and  I usually put some butter on the top of it. 
Store in Zip-Loc bags...enjoy one loaf now and then freeze another loaf to enjoy on a different day.
I keep mine in the fridge until ready to serve.

THIS bread freezes well 
and is great to pull out of the freezer and slice up, 
add in an apple, string cheese or boiled egg 
and some carrot sticks and you have a yummy lunch.
Enjoy!

Wednesday, June 19, 2013

Homemade Pudding...perfect for Shortcake or Trifle!

 Summer is here!
The berries are on and with the abundance of strawberries, raspberries and other yummy fruits, we have a longing to enjoy Shortcake, or some kind of trifle. 

I come from a family of amazing cooks!
I connect in particular with my Grandma Ruth. 
(My dad's mom died shortly before I turned nine,
after a short, but, courageous battle with lung cancer...
She had NEVER smoked a day in her life!
(here to read more about this)

 My grandpa married a year later, 
bringing this wonderful woman Ruth into our family).

My Grandma Ruth made everything from scratch and I always loved her homemade pudding.  
I grew up in a home where we just opened a box,
dumped in milk,
shook the mixture in a quart jar and that was pudding
and so it really made an impression on me that you could take basic ingredients,
boil them together and that made the yummiest pudding I had ever tasted.
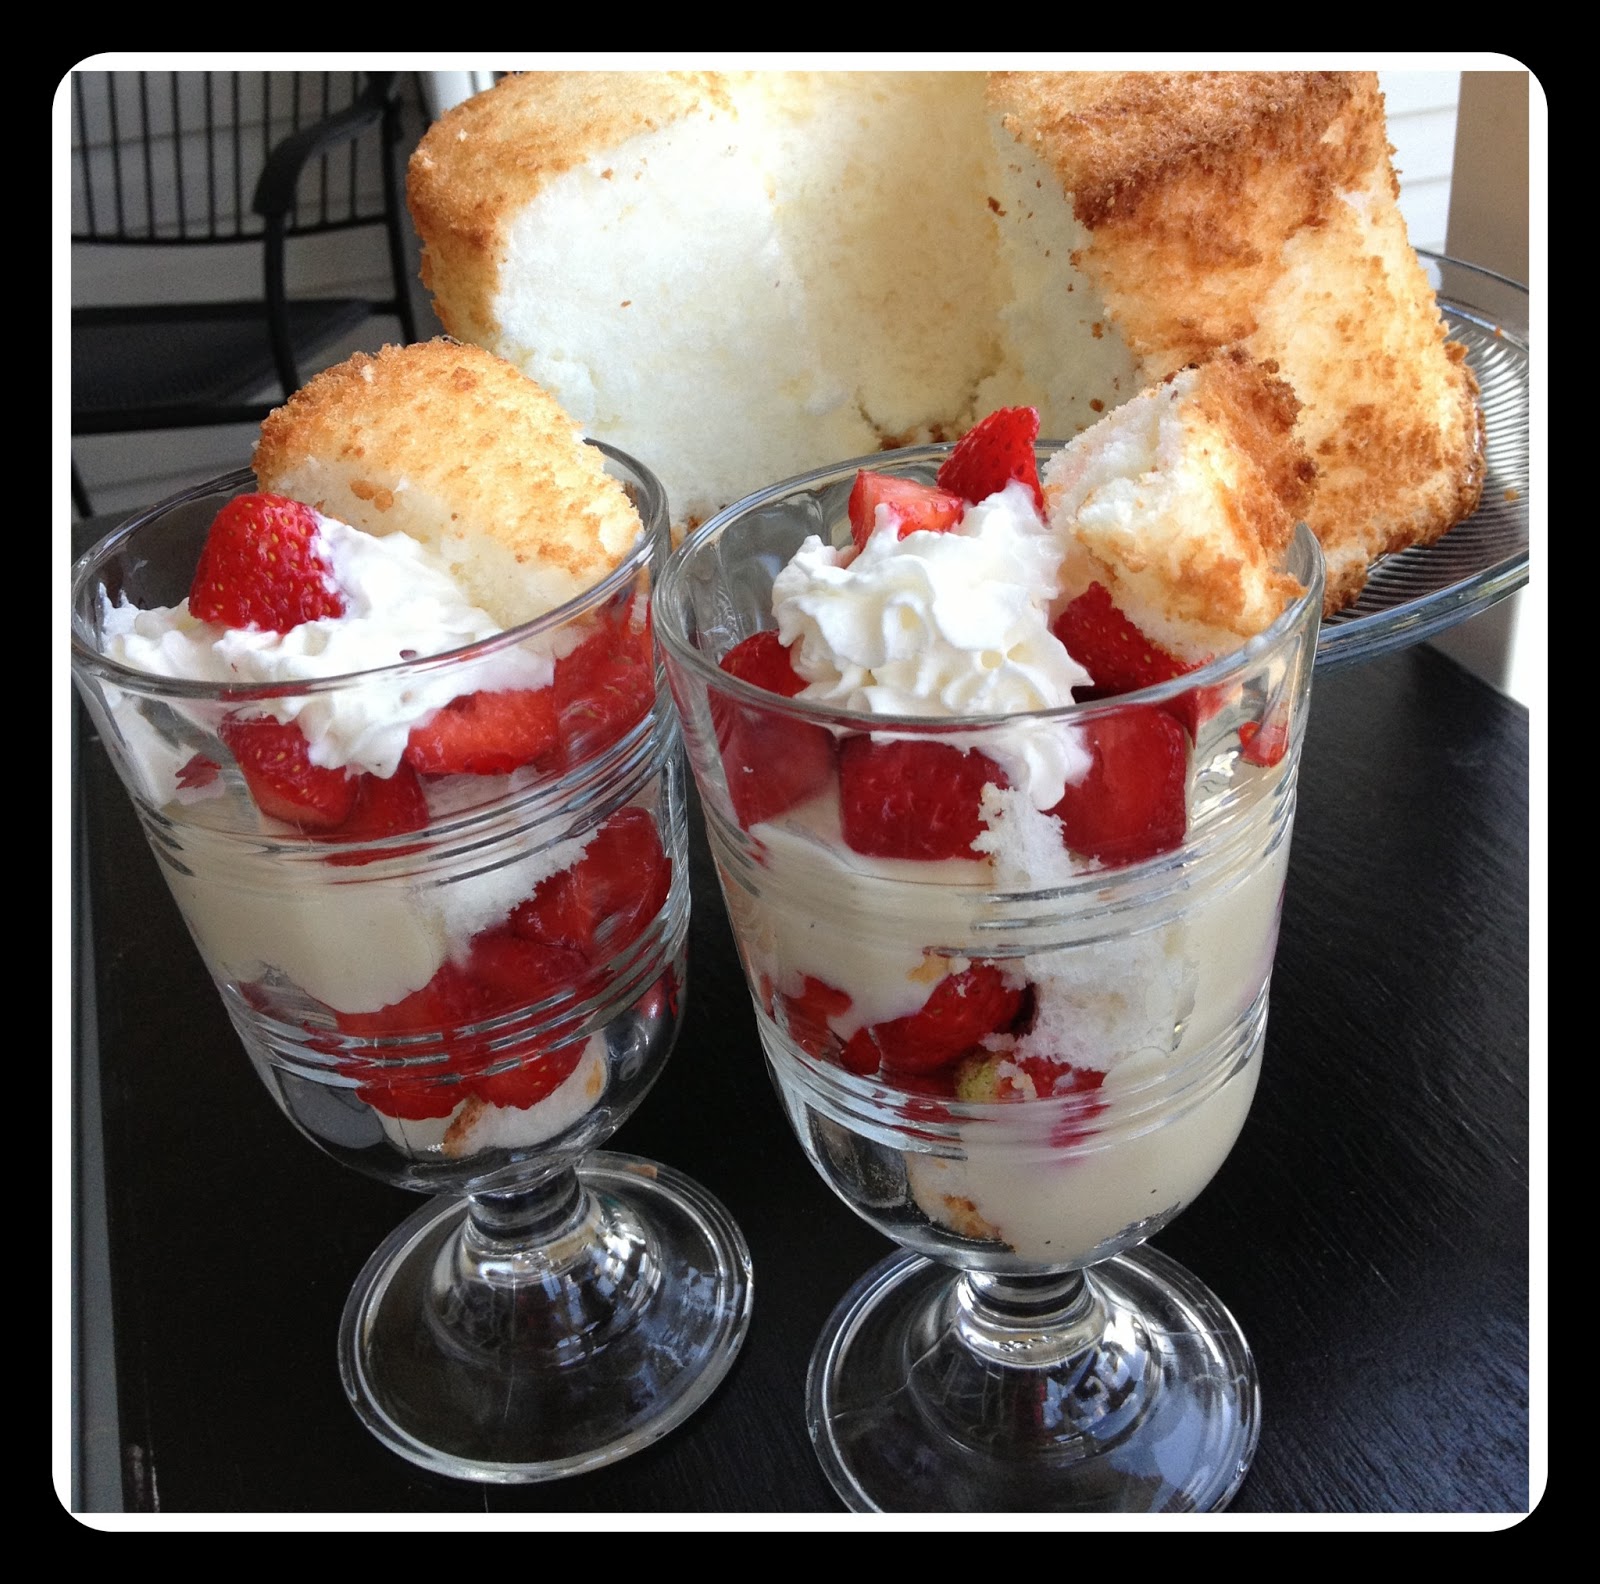
So, what do you think happened this past week, when our neighbor knocked on our door with a giant ice cream bucket full of the most ripe and juicy strawberries from their garden?!?
My hubby asked if we would make up an Angel Food Cake and enjoy it with our strawberries.  
(I cheated and used a "box" to make up the cake, only because I didn't want to sacrifice 12 eggs to make the cake entirely from scratch).

I do have to admit, that Angel Food Cake 
made from a box, tastes pretty darn delicious 
AND 
I have a very special spot in my heart for it, as this was my sweet sister Kandee's VERY favorite cake. Nearly every birthday she celebrated, we always had Angel Food Cake, made with love from a box!  It's so sad that she is no longer with us. I miss her dearly and it's almost been 10 years since she's been gone.
SORRY... 
I digress... now back to my post. 

Ethan thought he had died and gone to heaven!  
This was the first time he can remember 
ever eating Angel Food Cake.  

Here is the recipe for homemade Vanilla Pudding, 
that is from my sweet Grandma Ruth. 
I'm SO glad I can continue 
sharing her recipes with my own family!
Basic Vanilla Pudding
3 ½ cups milk
2 beaten eggs
¼ cup unbleached flour
¼ cup cornstarch
½ cup white sugar
Big handful of brown sugar
Combine all ingredients together and cook on stove until mixture boils and thickens.
Remove from heat and 
add in 2 teaspoons vanilla 
and 2 Tablespoons butter
Stir until well combined.
Cover top of pudding with plastic wrap and let cool 
(the plastic wrap keeps the pudding from getting a film on the top).
 
For Trifle...
Layer the following:
Cake, Pudding, Berries (do this twice)
Top with whipped cream, a strawberry and a small slice of cake...
Voila!   
You have a yummy dessert that is fit to serve to a king!

PS...This is also a great filling for cream puffs or anything where you need pudding.   
You can also add sliced bananas and put in a cooked pie crust, top it with whipped cream and have “Banana Cream Pie”.
Enjoy a delicious 
summer-time indulgence today!!  

Saturday, May 4, 2013

Gourmet Chicken Bacon Ranch Pizza...made at home!

 We have a NEW weekend LOVE!
That of Chicken, Bacon and Ranch Pizza,
 cooked on a baking stone,
it seriously tastes and smells like you're eating at a pizza parlor!  

We love being thrify,
we love making gourmet, yummy things at home 
that replicate something that you would get to eat a yummy restaurant.

While homemade pizza is good, it is still really "hit and miss" with either having too thick of a crust, that is doughy, or too thin of a crust, that is too hard and crunchy.
Well, I have finally worked through things and got the PERFECT crust...
The crust is a dough that you let rise 1-2 hours
you then 
heat a baking stone up in a 500 degree oven for 25-30 minutes 
and those two things make the PERFECT crust 
that is chewy and moist on the inside 
and crunchy on the bottom and the edges.
 I love that since we purchase a $4.88 Rotisserie Chicken each weekend on our Friday night date and the rest of the ingredients are things that we always have on hand,
that our Saturday and or Sunday afternoons contain this yummy pizza on the menu.
While you're making Saturday morning pancakes,  
simply cook 2-3 slices of bacon, 
chop the tomatoes & green onions,
grate the cheese 
and then you have everything ready to go, 
and pull from your fridge when you hit lunch time or dinner time.  
(All you need to do is just mix the dough and let it rise for 1-2 hours time)

Chicken Bacon Ranch Pizza 

(pizza dough...enough for one large pizza)
1/2 cup warm water
1-1/4 teaspoon yeast 
1-1/2 teaspoon sugar
1 teaspoon salt 
1 Tbsp. olive oil 
1-1/2 cups unbleached flour 
Mix together water, yeast and sugar in the bowl of a standing mixer and let sit 10 minutes until bubbly.
Then add in salt, olive oil and flour and use dough hook and mix until dough looks nice and smooth.   
Turn up speed to medium and let mix for 5 minutes.
Put dough in a bowl and coat well with oil, cover with plastic wrap and let rise 1-2 hours. 

Pizza Toppings:
1/4 cup Ranch dressing
1-2 cups chopped chicken
2-3 slices bacon cooked and crumbled
1 large tomato diced (or 2 small ones)
3 diced green onions
1/2 cup grated Parmesan or Asiago Cheese
1/2 to 1 cup grated cheese (we like Sharp cheese, but any cheese will do).

How to cook:
Put baking stone in oven and turn temp to 500 degrees.  
Let oven heat up for 30 minutes with the baking stone in the oven.
Cut a piece of parchment paper the same size as the baking stone and  
sprinkle cornmeal on the parchment paper.  
Put pizza dough onto the cornmeal coated parchment paper and work dough out to the edges of the parchment paper, until you have a large circle. (you're welcome to use a rolling pin to do this as well)
NOW put this onto the baking stone
BAKE the pizza dough for 5 minutes.
REMOVE pizza from oven    
top with a thin layer of Ranch dressing then 1/2 cup cheese
then sprinkle evenly the cooked chicken, bacon, tomatoes and green onions.
Lastly top with Parmesan cheese and the rest of the grated cheese.
Bake 10-12 minutes until crust is browned and cheese is melted.  

Slice into 8 pieces, dish up and enjoy the deliciousness of a gourmet pizza for a fraction of the price AND in the comfort of your own home!  
Try making some PIZZA HEAVEN today!
You and your family will be glad you did!  

Tuesday, April 9, 2013

Potato Casserole! (with NO Cream Soup)

I'm feeling thrilled with life  
because I finally have tweaked all of my recipes 
that use Canned Cream Chicken/Mushroom soups!   

Yay for not having to add in the canned 
"who knows what's in it", 
to my Potato Casserole anymore! 

I pretty much just took the sauce that I made for my Chicken Enchiladas (here) (minus the green chilies) and it makes the YUMMIEST Potato Casserole that is the perfect accompaniment to Baked Ham or Chicken and the leftover casserole makes the BEST hashbrowns for breakfast! 

OH and it's totally frugal as well, 
 because I just take the carcass from our Rotisserie Chickens, boil it for an hour and use that yummyness for the Chicken Broth.  

No Cream Soup Potato Casserole

Boil 8 large potatoes until tender and then run under cold water and then peel and dice them into chunks

2 Tbsp. Melted butter
1 onion finely chopped
(one recipe of sauce below)
1 cup grated cheese of your choice (I use SHARP cheese)
salt and pepper to taste

(sauce)
3 Tbsp. butter
1/3 cup flour
2 cups chicken broth
1 cup sour cream
Melt butter and then add in flour and whisk until well combined
Add in chicken broth and whisk together and boil until thickened (about 5 minutes)
Add in sour cream and stir until smooth.

Mix together potatoes, melted butter and onions.
Salt and Pepper to taste.
Add in white sauce/sour cream mixture and cheese.
Pour mixture over potatoes and stir until well mixed.
Put in 9x13 pan...
Bake covered at 350 degrees for 60-75 minutes—
uncover last 10 minutes.

Enjoy homemade yummyness 
that's not only frugal, 
but that just uses basic ingredients 
and isn't filled with lots of preservatives!
I can guarantee everyone you serve 
this to will be saying "Yum!"!

Thursday, November 15, 2012

Preserving and Canning Chicken

I love being prepared... 
I love having yummy things on hand to throw together a dinner or lunch for my family!  
I have always been scared to pressure can because of all of the horror stories I have heard from my mom about pressure canners blowing up!  
HOWEVER, I am here to tell you, it's so easy to pressure can AND there is never going to be anything blowing up, if you follow the directions.  
For the past 2 years, 
I have been buying chicken, salmon, ham and strawberries from Zaycon Foods and have loved how quality the meat and fruit is AND how yummy as well.  

However, while I love pulling frozen chicken breasts from the freezer, there are many days when I haven't planned ahead and it's dinner time and so many recipes that have chicken in them don't get made up because I don't have time to defrost the chicken.
 However, thanks to a pressure cooker, 
I now have dozens of pint jars on my shelf, for those quick and easy dinners and soups AND I love having jars of chicken to grab and make Chicken Salad Sandwiches for lunch, or to add to a pasta salad.  

Canned chicken is delicious and is truly a staple at our house!   
ALBEIT, while it is yummy, 
it definitely looks like a "Science Project" 
when you look at the jars, 
OR, as my kids call it...
SICKEN! (wink)
I have canned chicken fresh out of the box after I have purchased it,  
OR, I'll individually package the chicken and put it in my freezer and then after the busyness of the holidays are over and we are in the long, cold month of January, I'll pull out my pressure cooker and defrost some bags of chicken breasts and can a bunch of chicken up then.
SO easy...
you just take your HOT pint jars
fill with sliced chicken chunks leaving 1 inch of head room
add in 1/4 tsp salt
put on sterlized lids and rings
(you do NOT add any water to the jars!!)
Put jars in pressure canner
(follow directions on your pressure canner, for how many jars you can put in it, for what water to add to the pot and for how long to let pressure build before you start timing your canning).
After canner builds to 12 pounds of pressure
let it cook for 75 minutes for PINT jars.
(watching so it stays at a consistent 12 pounds of pressure)
Let pressure canner drop pressure and cool,
Open the canner and pull out the jars and 
VOILA,  
you now have jars of yummyness to enjoy all throughout the year!  
Congratulations!  
Now you have one more skill in your life to be prepared AND knowing how to process and preserve your own foods is a great self-reliance skill, so you can take advantage of great sales on chicken when they come around!
Enjoy being thrifty and frugal!