Showing posts with label adding fun to dinner. Show all posts

Sunday, October 27, 2013

Finger Bread Sticks... perfect for Halloween!


I LOVE adding fun to dinner!
It's amazing how you can take your normal Bread Stick dough 
and shape it into a different shape and 
Voila... 
you instantly have exited family members,
 Ooohing and Aaahing and thinking that you really did something extraordinary!  

Why not make up a batch of Finger Bread Sticks to serve along side your bowls of soup or Chili during October!  
I promise you it will be a BIG hit for sure!  

Biggest advice of all with making these, 
is to make sure to make them long and skinny, 
because the dough rises quite a bit during baking 
and they can turn out really chubby and fat, which is totally okay, 
because rather than calling them "Witch Fingers"
you can call them "Monster Fingers"!


However fat or skinny they are, 
I promise you, you'll have a happy family 
that is grateful to have a mom that tries to add FUN 
to dinner and VARIETY to normal everyday life!


Finger Bread Sticks 
1 Tbsp. yeast
2 Tbsp. sugar
1-1/2 cups warm water
1 tsp. salt
3 to 3 1/2 cups flour

Mix yeast, sugar and water together and stir well.
Slowly add one cup of flour and salt and stir.
Then add enough flour until dough is no longer sticky.
Knead for 5 minutes.
Place dough in an oiled bowl, cover and let rise for 1 hour.
Break off small pieces of dough and roll them into finger shapes. (I can usually make 20-24 fingers)
Cut 2 slits in the middle of the shape for the knuckles
SMASH a whole almond into the end of the dough for the finger nail. 
Brush with melted butter
Sprinkle generously with Granulated Garlic and freshly grated Parmesan, OR, Romano Cheese.
Bake at 400 degrees for 15 minutes (don't overbake) 
Enjoy!

PS... the leftover Bread Sticks are perfect to throw in lunches the next day for school or work

Sunday, July 7, 2013

Artisan Bread Dough... makes Calzones!

 Homemade Artisan Bread is a staple at our home.
It has the best texture,
the best flavor,
it makes the best toast ever
and is the perfect accompaniment to soups and salads!
AND
the best part of all... The dough is in your fridge 
ready to make bread anytime you need it.
We have found another wonderful 
use for the Artisan Bread Dough...
making homemade Calzones!


HERE for Artisan Bread Dough Recipe 
Calzones (from Artisan Bread Dough)

Pull off grapefruit size piece of dough...
Roll out on floured surface into 12 inch circle...
On 1/2 of the dough put pepperoni and cheese.
Fold over the other half and seal the edges well.
Prick top with fork
Melt 1 Tbsp. butter and spread on the top of Calzone
Sprinkle with granulated garlic, Italian Seasoning and Grated Parmesan Cheese 

Put Calzone onto baking stone that has generously been sprinkled with cornmeal 
Bake for 25 minutes at 450 degrees. 
Let sit for 10 minutes before cutting 
Cut into 4-6 pieces and dip in pizza sauce and enjoy!
I love being able to add 
a little bit of FUN to dinner 
and I LOVE 
having a family that enjoys and appreciates 
whatever graces our table for dinner!

Saturday, May 4, 2013

Gourmet Chicken Bacon Ranch Pizza...made at home!

 We have a NEW weekend LOVE!
That of Chicken, Bacon and Ranch Pizza,
 cooked on a baking stone,
it seriously tastes and smells like you're eating at a pizza parlor!  

We love being thrify,
we love making gourmet, yummy things at home 
that replicate something that you would get to eat a yummy restaurant.

While homemade pizza is good, it is still really "hit and miss" with either having too thick of a crust, that is doughy, or too thin of a crust, that is too hard and crunchy.
Well, I have finally worked through things and got the PERFECT crust...
The crust is a dough that you let rise 1-2 hours
you then 
heat a baking stone up in a 500 degree oven for 25-30 minutes 
and those two things make the PERFECT crust 
that is chewy and moist on the inside 
and crunchy on the bottom and the edges.
 I love that since we purchase a $4.88 Rotisserie Chicken each weekend on our Friday night date and the rest of the ingredients are things that we always have on hand,
that our Saturday and or Sunday afternoons contain this yummy pizza on the menu.
While you're making Saturday morning pancakes,  
simply cook 2-3 slices of bacon, 
chop the tomatoes & green onions,
grate the cheese 
and then you have everything ready to go, 
and pull from your fridge when you hit lunch time or dinner time.  
(All you need to do is just mix the dough and let it rise for 1-2 hours time)

Chicken Bacon Ranch Pizza 

(pizza dough...enough for one large pizza)
1/2 cup warm water
1-1/4 teaspoon yeast 
1-1/2 teaspoon sugar
1 teaspoon salt 
1 Tbsp. olive oil 
1-1/2 cups unbleached flour 
Mix together water, yeast and sugar in the bowl of a standing mixer and let sit 10 minutes until bubbly.
Then add in salt, olive oil and flour and use dough hook and mix until dough looks nice and smooth.   
Turn up speed to medium and let mix for 5 minutes.
Put dough in a bowl and coat well with oil, cover with plastic wrap and let rise 1-2 hours. 

Pizza Toppings:
1/4 cup Ranch dressing
1-2 cups chopped chicken
2-3 slices bacon cooked and crumbled
1 large tomato diced (or 2 small ones)
3 diced green onions
1/2 cup grated Parmesan or Asiago Cheese
1/2 to 1 cup grated cheese (we like Sharp cheese, but any cheese will do).

How to cook:
Put baking stone in oven and turn temp to 500 degrees.  
Let oven heat up for 30 minutes with the baking stone in the oven.
Cut a piece of parchment paper the same size as the baking stone and  
sprinkle cornmeal on the parchment paper.  
Put pizza dough onto the cornmeal coated parchment paper and work dough out to the edges of the parchment paper, until you have a large circle. (you're welcome to use a rolling pin to do this as well)
NOW put this onto the baking stone
BAKE the pizza dough for 5 minutes.
REMOVE pizza from oven    
top with a thin layer of Ranch dressing then 1/2 cup cheese
then sprinkle evenly the cooked chicken, bacon, tomatoes and green onions.
Lastly top with Parmesan cheese and the rest of the grated cheese.
Bake 10-12 minutes until crust is browned and cheese is melted.  

Slice into 8 pieces, dish up and enjoy the deliciousness of a gourmet pizza for a fraction of the price AND in the comfort of your own home!  
Try making some PIZZA HEAVEN today!
You and your family will be glad you did!  

Thursday, March 15, 2012

Pi Day Menu 2012!

 March 14th aka... 3.14
such a FUN day at our house!
3.141592653589

I love having a hubby that also adds FUN to our lives 
with fun events and that being the celebrating of Pi Day!  
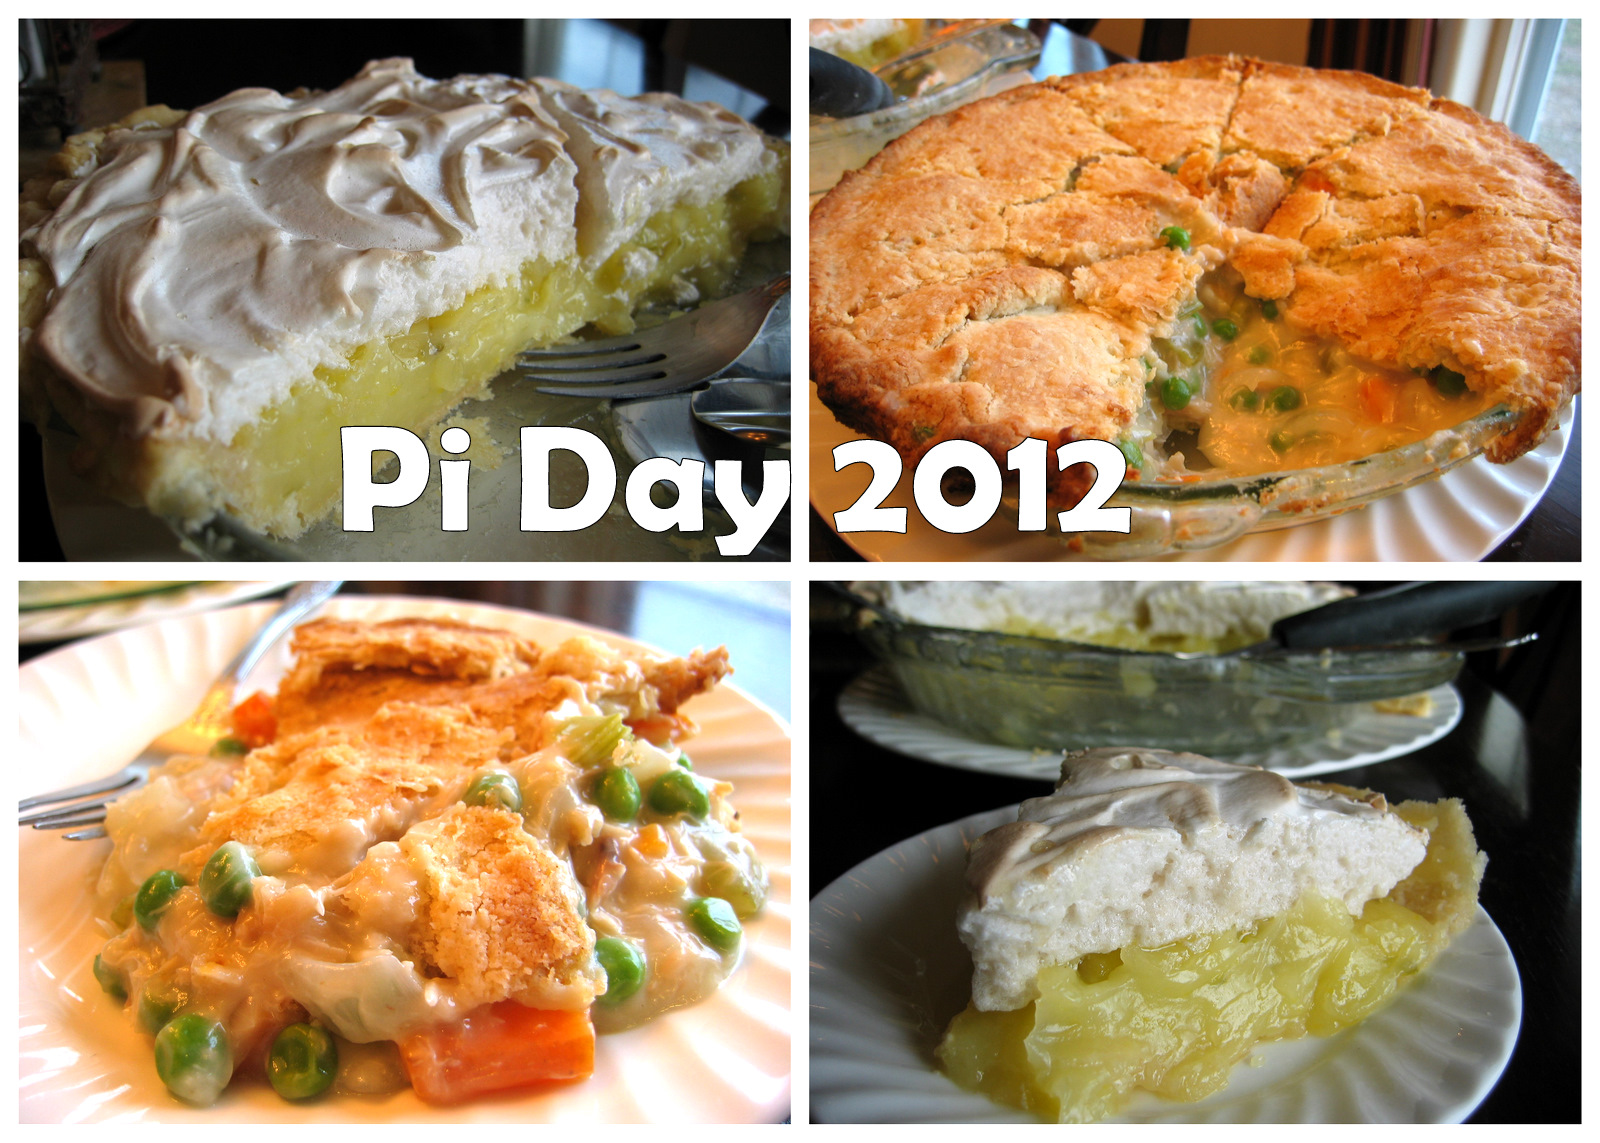
Since I'm not currently working I kind of am out of touch with the days of the month and yesterday when I got an email from Tracy that it was Pi Day and we should have PIE for dinner, I quickly got a menu together from what I had on hand.

First, I made a batch of pie crust and let it chill....
I then pulled a Rotisserie chicken carcass from the freezer and boiled it to make broth for Homemade Chicken Pot Pie... 
(making the soup for pot pie is a cinch, is quick and just uses basic ingredients that all of us have on hand)
I realized that I didn't have lemons to make our favorite Lemon Meringue Pie, however, I did have limes and so I made a LIME Meringue Pie instead! 
We enjoyed it every bit as much as we enjoy Lemon Meringue Pie!

My favorite part is when we are eating dinner....
I love how Tracy describes things to the kids...
(he is the BEST teacher!)
he taught them about the mathematical constant denoted by the Greek letter Pi and shared an easy way to remember it out to 12 decimals 
(kind of like memorizing a phone number).
3.141592653589 
We made up a song to memorize it and all night and all this morning my Ethan Kip keeps singing it! I don't think I'll ever be able to get it out of my head!  
So, now if I ever have to calculate the Earth's circumference, 
I'll be accurate to within 1/1000th of an inch! 

Anywho, here are the Pie Recipes we made up...
SO easy, SO yummy 
and you don't need fancy ingredients to make them up!  
Just a few simple ingredients and you can WOW your family 
with a dinner that is something you would get at a restaurant!

BTW...one pie crust recipe was enough dough to make the pot pie AND Meringue Pie
Pie Crust
½ cup REAL butter
2/3 cup shortening
1 Tablespoon sugar
½ teaspoon baking powder
1-teaspoon salt
1 Tablespoon dry milk powder
3 cups flour
½ cup cold water

Mix butter and shortening together.
Add half the flour and all of the dry ingredients.
Mix.
Add the rest of flour and water. (Makes 2 double crusts)

Roll out very thin with plenty of flour.
Carefully put in pie plates and prick with fork all over.
Bake 400 degrees for 8 minutes, or until lightly browned.

**************
The Key to a flaky pie crust
is to NOT try to make the dough look perfect and don't overwork it or it will make it stiff.

(Also, you can use ALL butter instead of butter and shortening---
if you choose this option it is 
20 Tbsp. of butter or 2-1/2 sticks)

Chicken Pot Pie 
Cooked chicken (however much you have)
1 large onion finely chopped
3 carrots chopped
2 celery stalks chopped
Add in small amount of broth or water and boil for 15-20 minutes until veggies are tender 
(set aside 1 cup frozen peas)

(sauce)
2 Tbsp. butter
1/2 cup flour
2 cups chicken broth
2/3 cups milk
1/4 tsp. seasoned salt

Melt butter in sauce pan and then add in flour and mix until combined.
Add in broth, milk and seasoned salt and whisk until thickened.
Pour broth mixture into pan with veggies.
Add in 1 cup frozen peas, stir well and put in pie crust pan
Put top pie crust on pie, pinch edges and
bake at 425 for 30-35 minutes until golden brown.
Let stand 10-15 minutes before cutting.
 
Perfect way to use the carcass from rotisserie chicken...put bones in pot and fill half full with water...boil and let simmer 30 minutes...strain off broth and use it to make this yummy dish.

Lime Meringue Pie
(1) 9 inch baked pie shell
1 ½ cups sugar
1/3 cup flour
1/3 cup cornstarch
½ teaspoon salt
2 cups boiling water
3 egg yolks
1/3 cup lime juice (I used 4 limes to get this much juice)
1 Tablespoon grated lime rind
3 egg whites (for meringue)

Combine dry ingredients in heavy saucepan.
Add water slowly, stirring until smooth.
Cook over medium heat until mixture thickens and boils, stirring constantly.
Stir small amounts of hot mixture into egg yolk, lime juice and lime rind.
Quickly stir into hot mixture.
Reduce heat to low and cook slowly, stirring for 2 minutes.
Remove from heat.
Pour into baked pie shell.
Top with meringue and bake at 400 degrees for 8-10 minutes.

(Meringue)
3 egg whites
¼ teaspoon cream of tarter
6 Tablespoons sugar
1 teaspoon vanilla
Beat egg whites with cream of tarter until frothy.
Gradually beat in sugar a little at a time. Add vanilla.
Continue beating until stiff and glossy.
Pile meringue onto pie being careful to “seal” meringue onto edge of crust to prevent shrinking. (Filling exposed to heat will “weep”).
Swirl or point top for design.
Bake for 8-10 minutes until delicately browned. 
Cool slowly away from draft.

Enjoy a little family fun tonight...
(even though it's not officially "Pi Day")
eating pie, 
learning a new math fact and 
having a BALL just being together and enjoying each others company around the dinner table!

Tuesday, March 13, 2012

Homemade Chicken Enchiladas! (with NO cream soup)

Soups, bean dishes, 
green smoothies and salmon/veggies  
are usually what is on the menu at our house, 
however, I really enjoy adding 
a little bit of FUN to dinner a few times a month!

I have always LOVED Chicken Enchiladas,  
however, I really try to avoid recipes that use cans 
of Cream of Chicken or Cream of Mushroom soup. 
If you follow my blog, you know that I love making things from scratch so that I know exactly what ingredients go into our meals!

So, I worked on a replacement for the can of soup 
and WOW, do we have a winner at our house!
I just melted butter, added in flour to make a roux, 
added in chicken broth and simmered until was thickened 
then added in sour cream and green chilies and it was PERFECT!!
Creamy Chicken Enchiladas
10 corn tortillas
2-3 cups grated cheese

(meat mixture)
1 large onion chopped
1 Tbsp. Olive Oil
2-3 cups cooked chicken
1 Tbsp. Chili Powder
Saute onion in olive oil under tender
Add in cooked chicken and chili powder and stir until combined

(sauce)
3 Tbsp. butter
1/3 cup flour
2 cups chicken broth
1 cup sour cream
1 can diced green chilies
Melt butter and then add in flour and whisk until well combined
Add in chicken broth and whisk together and boil until thickened (about 5 minutes)
Add in sour cream and diced green chilies and stir until smooth.

Spoon meat mixture and cheese on each tortilla and roll up and place seam side down in a greased baking 9x13 baking dish.
Cover with sauce and sprinkle with remaining cheese. 
Bake at 375 degrees for 30 minutes until bubbly and browned.
Top with your choice of tomatoes, lettuce, cilantro, salsa, or sour cream.

This is a family favorite that is always enjoyed 
by all each time it's made at our house!
I hope you enjoy it as well 
and you can feel good that you are 
using basic ingredients and aren't using 
canned soup to make it up!

Sunday, February 5, 2012

Adding Fun to Dinner with Winter Veggies!

Winter Veggies like
Butternut Squash and Sweet potatoes...
truly some of my favorite veggies to eat!  
I can honestly say I could eat them everyday 
and never tire of them.

If you do have Butternut Squash  
or Sweet potatoes on hand 
and want a yummy way to fix them up, 
I have two wonderful recipes that are perfect for them.

 Roasted Chicken and Veggies 
uses chicken thighs, garlic, rosemary, 
sweet potatoes, red potatoes, apples and pecans.
(this is perfect to feed a large crowd, OR, if you are a small family, 
use the leftovers to take for lunch to work/school the next day)

 Butternut Squash Casserole 
is full of  sauteed onions, squash, apples, ham, cheese and thyme,
and they truly blend together to make the most delicious casserole ever.
This would also be a perfect thing
to make for a breakfast casserole!


(BTW...I try and keep a few packages of Canadian Bacon in my freezer to have on hand for making Pizza, Calzones and this Casserole)


Definitely a delicious way to add 
some FUN to your dinner that nutritious as well!

(my sweet hubby's recipe card as he is the one that makes this up for us)
Rosemary Roasted Chicken and Veggies 
3 teaspoons paprika
2 heaping teaspoons crushed rosemary leaves 
3-4 cloves garlic minced
1/2 teaspoon coarse pepper
1/2 teaspoon salt 
3 Tbsp. olive oil
8-10 bone in chicken thighs  OR, 4-5 chicken leg quarters (skins removed)
3 sweet potatoes peeled and cut into 1 inch cubes
3 large potatoes peeled and cut into 1 inch cubes (or you can use 5-6 small red potatoes)
3 apples peeled and thinly sliced
handful of pecan halves 
Mix first 6 ingredients together in a bowl.
Put chicken, potatoes, apples and pecans in a large metal bowl and pour spice mixture over it and TOSS well to coat.  (using your hands is the best way to do this).
Arrange chicken/veggies in a large casserole dish that has been sprayed with non-stick cooking spray.
(HINT...I actually had to use 2 casserole dishes...so I just divided it between 2 pans as I didn't have one large enough)
Roast uncovered in 425 degree oven for 45-60 minutes until the veggies are tender and chicken has reached 165 degrees.
Absolutely delicious!   
If there are any leftovers,  
I just pull the chicken off the bones and mix with the veggies
and this makes DELICIOUS leftovers to take for lunch the next day.

This would also be the PERFECT meal to serve company... 
serve with a green salad and slice of Artisan bread and you could really feed a crowd!

Butternut Squash Casserole
1 large (or 2 small) butternut squash peeled, seeded and thinly sliced
2 large onions thinly sliced/then sauteed until very tender
2 small apples, peeled, cored and thinly sliced
2 teaspoons thyme
3 Tbsp flour
4 oz. shredded Swiss cheese
(6oz) package Canadian Bacon
1-1/2 cups chicken stock
2 pieces wheat bread toasted and crumbled

Preheat oven to 375 degrees.
In a shallow baking dish layer 1/3 of the squash, then ½ of the sauteed onions and then ½ of the apple slices. Season with a sprinkle of thyme, ¼ tsp pepper and a scatter of flour and 1/3 of the cheese. 
Layer half the meat.

For the second layer repeat the process topping with squash.
Add chicken stock.
Cover and bake for 30 minutes.
Remove from oven, uncover and sprinkle with bread crumbs and remaining cheese.
Return to oven uncovered and bake 30-45 minutes until veggies are tender
Remove from oven and let stand for 15 minutes before serving.

You will find after enjoying these yummy dishes 
that winter veggies never tasted SO good!
Enjoy and have fun!

Thursday, October 27, 2011

Adding Fun to Dinner! (just in time for Halloween!)


Spaghetti Squids (and Monster Mouths)
make Happy Kids!
SO, with Tracy's new love for Pinterest, we were browsing through photos and our kids spied a FUN photo and begged us to try making it up.

Anyone who knows me, knows that I'm a little bit of a "health nut"
and I am not a hot dog lover at all!  

Thank goodness  
that Tracy balances me out and he always tells me that
"eating a hot dog once or twice a year isn't going to hurt you".
SO, since I can't handle cheap hot dogs, we at least eat Nathan's ALL beef dogs.
We still had a package of  Nathan's left in our freezer 
 and so this is what we did to make what our kids call
"Spaghetti Squids". 
  
AND I do have to tell you that after eating 
this, it was REALLY tasty and yummy  
(and that says a lot, coming from someone who is not a fan of hot dogs).
(BTW... we only used 5 of the hot dogs 
and saved the rest for Tracy to take on a campout)   
 Try adding a little bit of FUN to dinner-time 
and watch the faces of your kids light up with excitement!
(it would be fun to surprise them and not see you prepare it and have them wondering 
"How did you do that"!) 

This would be SO much fun 
to make as a meal for Halloween!
OH, and don't forget about
"Monster Mouths" for dessert!!  
Apples, Peanut Butter and Candy Corn 
come together to make a tasty, holiday treat
(original post about Monster Mouths here)

Life is about balance 
and it's okay to splurge on a
not so perfect, not so healthy meal  
every once in awhile. 
Enjoy the taste and fun of the season!